Table of Contents
3D Printed Tardis
Summary Status for Second Tardis
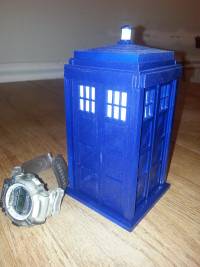
Switch is wired in. All parts glued on. Lights work. Just need to attach the Police Box signs.
Click here to read the posts on my blog about this project.
Description
Ahhh, Dr. Who. A British classic loved by generations of slightly different characters. My son happens to be one of those people who are fans of the good doctor. So, when I saw plans for a Tardis on Thingiverse, I knew I had to make it.
The 3d print plans seem to be one of the better sets on Thingiverse. Printing them on the Makerbot 3D printer is very easy. All you need is the files, and a computer with the MakerWare software, or an SD card. The Makerware software will turn the drawing files into g-code files that the Makerbot can understand and send the files to the printer or SD card. If MakerWare saves the g-code data onto the SD card, insert it into the Makerbot and fire it up.
Here are some of the things I learned while doing this project.
- Clean the printing surface before starting a print.
- Clean around the nozzle head before starting a print.
- Uninstall the filament, cut off the end, and reinstall it before printing to ensure that the filament was flowing at the start of the print.
- Print with a ramp for all pieces. This will prevent curling and make it easier to remove flat pieces from the print surface.
- Leveling the printing surface is crucial to getting a good print. If the filament is not sticking to the surface, try leveling it.
First Tardis
All parts are printed and painted. The Tardis is assembled. Gave it to Dmitry. He likes it.
I wanted to add lights but ran out of time. That will have to be part of the second try. I'd like to print a second Tardis now that I know more about how the printer works. The top pieces are weak since the infill setting was too low the first time. I also want to add the LEDs and a small battery.
I wonder how hard it would be to add the Tardis sound when a button is pushed…
3D Printer Settings
The print settings that I used for most pieces were:
- Infill: 30%
- Shells: 2
- Layer height: .20 mm
- Extruder temp: 235 degrees C (I think that helped it not get clogged)
- Build plate temp: 115 degrees C (This was supposed to help the work stick to the plate. Not sure it made a difference.)
Project Tasks
Download Tardis files from Thingiverse– DonePrint all pieces on Makerbot– DonePaint pieces navy blue– DoneAssemble Tardis– DoneAttach signs– Done
Second Tardis
3D Printer Settings
The print settings I am using for most pieces on the second Tardis are:
- Infill: 90%
- Shells: 2
- Layer height: .20 mm
- Extruder temp: 235 degrees C (I think that helped it not get clogged)
- Build plate temp: 115 degrees C (This was supposed to help the work stick to the plate. Not sure it made a difference.)
Here is a link to the electrical circuit for the LEDs.
Project Tasks
Print second set of sides– DoneReprint top pieces with higher infill– DonePrint new lamp parts– DonePrint battery holder– DonePaint all new pieces– DoneProcure parts for lighting– DoneAssemble lighting– DoneFind switch– DoneInstall switch into light circuit– DoneAssemble Tardis and test lighting– Done- Attach signs – Not started
- Donate original Tardis to Makerspace for sonic screwdriver holder – Not started
Makerspace members: Ken Becker
