Table of Contents
Laser Cutter Compressed Air Filter/Dryer
Parts of the Air Filter/Dryer

- Air supply from compressor in Vault Hallway
- Air supply shut-off valve
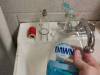
- Drain valve
- Harbor Freight Filter
- Harbor Freight Dryer
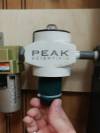
- PEAK Inlet Filter
- PEAK Air Purifier
- PEAK Air Dryer
- PEAK Outlet Filter
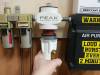
- Electronic air valves
Normal Operation
- When the shut-off valve is open, air passes from the components on the left side of the assembly to the right
- The Harbor Freight filter traps oil and debris from the supply air main that serves the building, this part accumulates mostly oil
- The Harbor Freight dryer removes moisture from the filtered air, this part accumulates both water and oil
- The PEAK inlet filter traps oil and debris before the purifier and dryer, this part accumulates mostly oil
- The purifier draws air through a series of channels and mesh screens
- The desiccant dryer removes any remaining moisture from the cleaned air
- The purifier and dryer reverse flow every 2 minutes to purge dirty/moist air
- The PEAK outlet filter traps any remaining debris downstream of the purifier and dryer, usually desiccant powder
- Air valves for each laser cutter are opened or closed by pressing the green buttons on the wired remotes
- NOTE: Even if none of the laser cutters are using compressed air, if the shut-off valve is open the air purifier will continue to run
- NOTE: Closing the shut-off valve stops the flow of oil, water, and debris into the filters
Which Parts To Clean and How
- Close the shut-off valve to turn off the air supply
- Clean the Harbor Freight Filter
- Slide the black latch down and twist the housing clockwise

- Pull the clear plastic chamber down and out of its socket

- Disassemble, wash with dish soap, dry, and reassemble

- Reinstall clean filter and housing when done

- Clean the Harbor Freight Dryer
- Slide the black latch down and twist the housing clockwise
- Pull the clear plastic chamber down and out of its socket
- Remove and dispose of old desiccant material

- Disassemble, wash with dish soap, dry, and reassemble


- Light should be visible through the wire mesh on the lower tube when clean

- Add new desiccant material to exterior chamber, do not put any in the middle tube

- Reinstall clean filter and housing when done


- Clean the PEAK Inlet Filter
- Firmly grasp the housing and turn it counter-clockwise to remove it
- Unscrew the fabric drum from the socket

- Disassemble, wash with dish soap, dry, and reassemble

- If the fabric material is worn through, replace with a scouring pad
- Cut a small piece of scouring pad material to fit around the drum

- Wrap the pad around the drum and use zip ties to secure it in place


- Reinstall clean drum and the housing
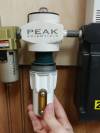
- Clean the PEAK Outlet Filter
- Firmly grasp the housing and turn it counter-clockwise to remove it
- Unscrew the fabric drum from the socket

- Disassemble, wash with dish soap, dry, and reassemble
- If the fabric material is worn through, replace with a scouring pad
- Cut a small piece of scouring pad material to fit around the drum
- Wrap the pad around the drum and use zip ties to secure it in place
- Reinstall clean drum and the housing
- Check all housings have been reinstalled and tightened
- Open the shut-off valve for the air supply
- Listen and feel for leaks at the drain valves on each component
- If any leaks are found, close the shut-off valve
- Remove the leaking part, disassemble it, and check its seals
- If air continues to leak, tag the 60-watt and 30-watt laser cutters with a red “needs repair” tag
- Lockout tags are located in the metal shop in a small yellow cabinet on the hand tool peg board
- Post a message on the member's only Google Group forum about the leak


